
1. Apple Developer Program 가입(연간 129000원)
과정이 생각보다 복잡했다. 법인으로 신청했는데, 신청을 해두니 하루쯤 후에 전화요청 이메일이 와서 전화를 받으니 되게 상세하게 이것저것 물어보며 본인확인을 진행했다. 완료되면 이제 다음 프로세스로 진행할 수 있는 메일을 보내줘서, 여기서 결제를 마치니 바로 승인이 되었다. (최대 48시간이라고 안내해줬는데 1분만에 됐다.)
2. 인증서 발급받기
Certificates, Identifiers & Profiles 탭에 들어간다.
https://developer.apple.com/account/resources/certificates/add
로그인 - Apple
idmsa.apple.com

Developer ID Application 선택
Xcode 설치가 안되어있다면 앱스토어에서 설치한다. 설치 후 아래 명령어로 설치된 Xcode와 연결된 개발 도구 경로를 설정해야 한다.
sudo xcode-select -s /Applications/Xcode.app/Contents/Developer
Xcode 버전 확인 후

Profile Type을 설정해줌
이제 CSR 파일을 불러와야하는데, 만들어야한다.
- /Applications/Utilities 있는 키체인 액세스를 실행하세요.
- 키체인 액세스 > 인증서 어시스턴트 > 인증 기관에서 인증서 요청을 선택하십시오.
- 인증서 도우미 대화 상자에서 사용자 이메일 주소 필드에 이메일 주소를 입력하십시오.
- 공통 이름 필드에 키의 이름을 입력하십시오(예: Gita Kumar Dev Key).
- CA 이메일 주소 필드를 비워두세요.
- "디스크에 저장"을 선택한 다음, 계속을 클릭하세요.
이제 저장된 키파일을 업로드한다.

완성된 키파일을 다운로드 해준다.
키파일을 열어서 key chain에 추가해주어야한다.


cer 파일이 다운로드 된것을 볼 수 있다. 이제 이걸로 어플리케이션에 서명을 할 예정!
문제가 생김..
뭔가 이상함. 이 인증서로 codesign을 하려고 시도하니
unable to build chain to self-signed root for signer "Apple Development: ..."
my.dmg: errSecInternalComponent이런 오류가 뜨면서 서명이 되지 않음.
찾아보니 인증서에 초록색으로 Trust가 되어있어야하는데 안되어있길래 Always Trust로 수정해봄.

그래도 안됨.
이번엔 뭔 인증서를 더 받아보래서 받아서 인증서에 설치해줌.
응 안됨. 싹 다 지우고 다시 처음부터 해봐도 안되고 답을 못찾고 사경을 헤매다 노트북 덮음
다른날 다시 켜서 차근차근 서치하고 확인해보니 10분만해 해결했다.
원인은 바로바로 ...!!!
인증서의 설치 위치!!!!
APPLE Developer에서 다운받은 cer 파일을 실행하기 전에, Keychain Access를 켜서 왼쪽 탭에 Login인으로 열어두어야한다. 그래야 cer 파일이 login keychains로 인식되어 그곳에 설치가 된다.
cer파일 클릭하면 설치창 자동으로 뜨길래 그런게 영향이 있는지 1도 몰랐다,, (맥 써본지 2주차라 각 창을 전체화면해야 맨 위에 설정창 뜨는지 아는것도 존재 자체를 몰라서 한참 헤맴ㅋㅋㅋ큐ㅠㅠ)
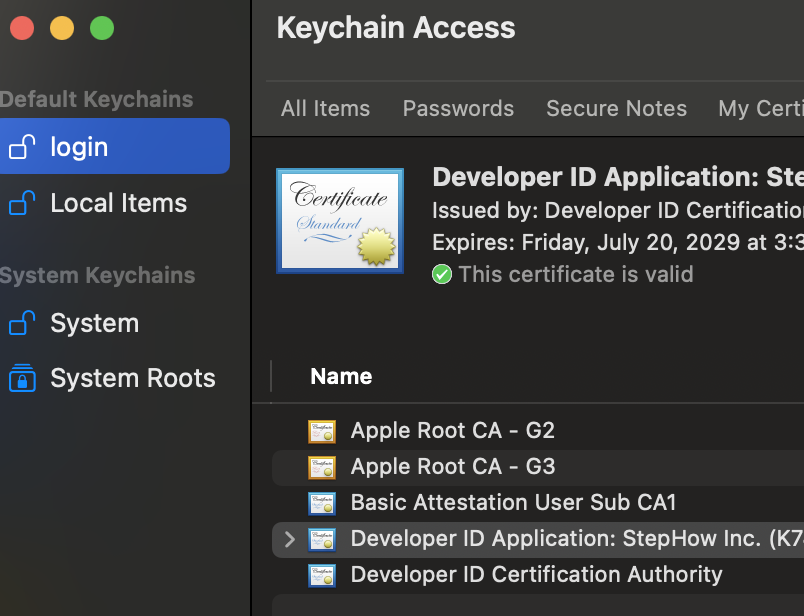
여기서 로그인탭 열어둬야한다는걸 알게되었다.
So You Want to Code-Sign macOS Binaries?
So You Want to Code-Sign macOS Binaries? - How to get a certificate, the process of code-signing & notarization of macOS binaries for distribution outside of the Apple App Store.
dennisbabkin.com
3. 코드서명
codesign --verbose --timestamp -s "Developer ID Application: [이름]. (문자열로이루어진ID)" --option=runtime 앱이름-arm64.dmg
아무튼 드디어 codesign 명령어로 사이닝을 하니 비밀번호를 입력하란 창이 뜨면서 제대로 서명이 되었다.

서명이 잘 되었는지 확인해보자.
codesign --verify --verbose=4 StepHow-0.3.6-arm64.dmg이 명령어를 입력했을 때
StepHow-0.3.6-arm64.dmg: valid on disk
StepHow-0.3.6-arm64.dmg: satisfies its Designated Requirement이렇게 되면 서명이 잘 된것.
하 행복 ㅠㅠ
근데 또 문제가 생김. 테스트로 s3에 올린 후 다운받아서 실행하려 하니 아직도 신뢰할 수 없다는 오류가 발생.

아 이번엔 또 노리타이제이션(공증) 이란걸 해줘야한다고 함.
4. 노타리제이션
코드 서명 및 노타리제이션이란 무엇인가
코드 서명과 노타리제이션은 macOS에서 소프트웨어의 안전성을 보장하기 위한 중요한 과정입니다. 간단히 요약하면 다음과 같습니다:
- 코드 서명
- 파일이 코드 서명된 후 변경되었는지 확인할 수 있도록 암호화 알고리즘을 사용합니다.
- macOS에서는 코드 서명된 이후로 한 비트라도 변경된 파일은 실행되지 않습니다.
- 이는 파일이 개발자가 서명한 이후로 변경되지 않았음을 보장하는 방법입니다.
- 노타리제이션
- Apple의 고유한 방식으로, 개발자가 코드 서명한 바이너리를 Apple 서버에 업로드합니다.
- Apple은 파일을 분석하고 지문(fingerprint)을 생성합니다.
- 노타리제이션이 완료되면 티켓이라는 파일을 받게 되며, 이를 원본 바이너리에 첨부해야 합니다.
- Apple은 수집된 해시를 통해 악성 소프트웨어를 식별하고 차단할 수 있습니다.
- 이는 원치 않는 소프트웨어의 확산을 막고, 책임 있는 개발자를 식별하는 효과적인 방법입니다.
이 과정을 통해 macOS에서 소프트웨어의 안전성을 높이고, 사용자에게 신뢰할 수 있는 소프트웨어 환경을 제공합니다.
https://appleid.apple.com/account/manage
Apple ID
Your Apple ID is the account you use for all Apple services
appleid.apple.com
여기서 App-Specific Passwords를 등록한다.
키체인 프로파일에 저장 (자격증명 저장)
xcrun notarytool store-credentials --apple-id "이메일" --team-id "개발자계정 고유식별자" --password "App-Specific Passwords" "<AppPwdKeychainID>"--apple-id : email
--team-id : 개발자 계정 고유식별자
--password : App-Specific Passwords에서 발급해주는 비밀번호
<AppPwdKeychainID> : App-Specific Password 만들 때 지정한 라벨
This process stores your credentials securely in the Keychain. You reference these credentials later using a profile name.

Validating your credentials...
Success. Credentials validated.
Credentials saved to Keychain.
To use them, specify --keychain-profile "<AppPwdKeychainID>"이렇게 뜨면 완료된거다.
이제 dmg 파일을 노타리제이션에 제출 한다.
xcrun notarytool submit "<path/to/notarize>" --keychain-profile "<AppPwdKeychainID>" --wait
이 작업은 시간이 좀 걸린다. 좀 기다리자. 20분정도 걸린다고 함 (더 걸릴수도,,)

끝이 안나,, 어차피 애플 서버에서 이루어지는 작업이라 그냥 다른거 하다가 아래 명령어로 완료되었는지 확인하자.
xcrun notarytool history --keychain-profile <AppPwdKeychainID>
너무 오래걸리면 아래 사이트에서 상태 확인
https://developer.apple.com/system-status/
노타리제이션이 완료되면 아래 명령어로 요청상태를 확인해본다.
xcrun notarytool history --keychain-profile "<AppPwdKeychainID>"
문제가 있거나 로그가 보고싶다면 아래 명령어로 요청한 공증의 로그를 확인할 수 있다.
난 여기서 notarizatin Invalid가 무한대로 떴는데 결론만 말하면 프로젝트에서 사용하는 npm 모듈 하나가 문제가 있었다. 서명이 자동으로 되지 않아서 모듈 내부 파일 뜯어서 서명하도록 스크립트도 짜봤지만 뭔짓을 해도 서명이 올바르게 되지 않아서 결국 그냥 모듈을 다른걸로 바꿔버림. 내가 사용한 모듈이 아니었어서 처음에 변경할 생각을 못했었는데 (+ 모듈이 하는 행동이 꼭 필요한 거라 당연히 유명한 검증된 모듈인줄 알았는데 찾아들어가보니 다운로드수가 썩 많지는 않았다. 그래서 이 모듈에서 서명이 안되는 이유같은건 아무리 찾아도 나오지도않음) 아무튼 바꾸니까 무사히 성공했다. (사실 시행착오 많았음ㅋㅋㅋㅠㅠ실제로는 electron-buidler를 사용했기 때문에 여기 옵션 지정때문에 많은 혼란이 있었다. 이건 다음 포스팅에!)
xcrun notarytool log <UUID> --keychain-profile <AppPwdKeychainID>
완료되면 애플에서 티켓을 발급해준다고 한다. 물리적인 파일로 제공되지 않고, 노타리제이션 상태를 확인할 때 응답의 일부로 포함된다.
이를 원본 파일에 스테이플링(stapling)해야 한다.
xcrun stapler staple "path/to/StepHow-0.3.6-arm64.dmg"
스플레이팅이 제대로 완료되었는지 확인해준다.
spctl -a -v "path/to/StepHow-0.3.6-arm64.dmg"
명령어 출력에 accepted와 source=Notarized Developer ID가 포함되어 있으면 성공적으로 완료된 것.
이렇게 모든 과정이 완료된 파일은 macOS의 Gatekeeper가 해당 파일을 신뢰할 수 있는 파일로 인식하므로, 설치 및 실행 시 경고 메시지가 나타나지 않는다.
Gatekeeper란 무엇인가?
Gatekeeper는 macOS에서 사용자가 다운로드한 애플리케이션을 실행할 때 보안을 강화하기 위해 Apple이 제공하는 보안 기능입니다. Gatekeeper는 애플리케이션이 신뢰할 수 있는 출처에서 온 것인지 확인하고, 사용자에게 잠재적으로 위험한 소프트웨어로부터 보호합니다.
Gatekeeper의 주요 기능
- 코드 서명 확인:
- Gatekeeper는 애플리케이션이 신뢰할 수 있는 개발자에 의해 코드 서명되었는지 확인합니다. 코드 서명은 소프트웨어가 변경되지 않았음을 보장하는 디지털 서명입니다.
- 노타리제이션 확인:
- macOS Catalina(10.15) 이후, Gatekeeper는 노타리제이션된 애플리케이션만 허용합니다. 노타리제이션은 Apple이 애플리케이션을 검사하고 승인하는 과정입니다.
- 애플리케이션 출처 검증:
- Gatekeeper는 애플리케이션이 Mac App Store 또는 신뢰할 수 있는 개발자로부터 온 것인지 확인합니다.
Gatekeeper의 동작 방식
- 애플리케이션 다운로드:
- 사용자가 인터넷에서 애플리케이션을 다운로드합니다.
- Gatekeeper 검사:
- 애플리케이션을 처음 실행할 때 Gatekeeper가 이를 검사합니다.
- 애플리케이션이 신뢰할 수 있는 출처에서 왔고, 코드 서명 및 노타리제이션이 완료되었는지 확인합니다.
- 결과에 따른 동작:
- 신뢰할 수 있는 애플리케이션: 애플리케이션이 코드 서명되고 노타리제이션된 경우, 사용자에게 경고 메시지 없이 실행됩니다.
- 신뢰할 수 없는 애플리케이션: 애플리케이션이 서명되지 않았거나 노타리제이션되지 않은 경우, Gatekeeper는 경고 메시지를 표시하고 실행을 차단합니다.
다음 글은 electron+github+s3로 자동업데이트와 배포과정 자동화에 코드서명과 공증을 넣는 방법에 대해 포스팅 예정
'🩵electron' 카테고리의 다른 글
| Electron을 사용한 Windows 애플리케이션 자동 업데이트 및 EV 인증서 코드 서명 설정 (0) | 2024.09.05 |
|---|---|
| windows 설치파일 digitcert로 전자서명 하기 (0) | 2024.07.17 |
| 직접 개발한 exe 실행파일을 실 유저에게 배포하려면? (코드 전자 서명) (0) | 2024.05.27 |
| electron s3 github actions 자동 배포 및 autoUpdater 설정 (0) | 2024.05.07 |
| electron 디컴파일 해보기, 방지하기 (2) | 2024.04.29 |